—
- A few weeks back, we published a blog on our top 3 ingredients for leveling up your Live Coaching Sessions.
- Here we revisit the content of that post and add video examples so you can see the ideas in action.
A few weeks back, we published a blog on our top 3 ingredients for leveling up your Live Coaching Sessions.
In response to that post, requested that we provide examples for each section to better see the ideas in practice.
So – you guessed it – that’s exactly what we’re doing today.
Hope you enjoy 👊
Coach and Athlete Video Recaps:
In the first recap, record a video of your athlete/client within their CoachNow Space, explaining their biggest takeaways from that session.
As they reflect on the session, elaborate upon any points they make, and be sure to clarify any misunderstanding. Make sure to succinctly explain WHAT the practice plan is going forward and most importantly, WHY it's paramount for their improvement.
The goal here is to give your athlete the chance to show what they've retained, ask clarifying questions and give you as coach the opportunity to fill in the gaps… all in 1-3 minutes.
Some notes from the video:
- I had him explain my feedback in his own words. And, when doing so, he commented on his past mistakes and how he intends to fix them in the future.
- I also encouraged him to not just talk about what we fixed- I asked him to perform the drill in front of me while the camera was rolling. Ideally, this “puts him on the spot” a bit and further engrains the finer movements of the exercise for when he’s practicing on his own.
- Throughout his explanations, I validated the points he was making with a simple “yup”. It’s a small feedback loop that gives the athlete validation and lets him know that he was on the right track. He was on the money with his explanations in this example. BUT, if he wasn’t, this would also be my chance to correct or recalibrate any inaccurate information or misconceptions as we wrapped up our session together.
Next, it’s your turn as the coach.
In your video recap, highlight any mistakes you corrected and the advice you gave for how to fix them. Give a simple, yet thorough explanation of what’s expected of them moving forward to achieve their goals.
Do NOT ramble on and on.
Some notes from the video:
- Notice how before I recapped what my athlete was doing incorrectly, I started with a timely compliment, “what we discovered at the end after a BUNCH of positive changes…”. Whenever possible, find a way to quickly acknowledge what's going well, before diving into constructive feedback.
- Next, provide that constructive feedback with context e.g. “this is what you were doing before, this is what we fixed and why we fixed it”.
- I tried to speak as simply as possible, stacking the advice in a step-by-step way. Don’t overcomplicate by getting in the weeds of EVERYTHING you covered - focus on what the most important changes are and give a simple step-by-step recipe for improvement. Keep it succinct.
- I summarized each of the major topics we covered during the session - “right arm only”, “left arm only”, “the freddy drill”, etc. I also encouraged him to ask questions as I spoke to make sure he had a record of me clarifying any points of confusion. Remember, this is meant to be a strategic conversation that summarizes the broader goals of the coaching session!
IMPORTANT: There’s a reason video recaps are at the top of this list – I’ve found them to be a total gamechanger and invaluable to the repertoire of any ConnectedCoach.
Video and/or Image Analysis of Technical Movement(s):
Video and/or image analysis is a potent coaching tool IF done right. I recommend using part of your live session to go over any vital technical aspects and fine motor skills required for the sport you coach.
I.e. use part of your in person time to focus on form. Be it a movement, strength-building exercise, swing, throw, etc.
Ideally, you’ll want to record the technical move toward the beginning of the session to establish their baseline before you provide feedback and tools for improvement
Then film another video or take another image at the end of the session for comparison and reflection.
- First off, note that I’m taking advantage of the side-by-side comparison and voice over features in CoachNow. Using this tool, I’m able to stop and start each video independently, while using voiceover to comment on what I’m noticing. This is a fan favorite feature, and is highly useful for technical analysis.
- I stop and start often and include markups to highlight the points I’m making in the voice over. Having just the voice is valuable, but annotating while I’m speaking helps with both verbal and visual learning when he’s practicing on his own.
- Even though his form on the right wasn’t perfect, I commended the progress we are making within the live session. By taking the video on the left at the beginning of the session, I’m able to really cement my value as a coach and celebrate the little wins we are achieving while I improve his form within a single session. The purpose of this is simple: seeing progress in just a one-hour session will help IMMENSELY with the athletes confidence. Plus, they’ll leave with a much clearer understanding of WHAT they need to work on and WHY.
Practicing with these before and after videos will really level up your game and deliver immense value to your athletes. Give it a try!
3. Post a Practice Plan with CLEAR GOALS For Your Next Live Session.
In addition to your video recaps, and progress tracking of technical move(s), now it's time to identify and post a practice plan in your athletes Space.
In my experience, the best practice plans are done in writing as their OWN text posts. This makes them easily searchable and helps create a clear break in your CoachNow Feed between all the videos you post during the session.
And when building these plans, I highly recommend sticking to LISTS – whenever your athletes go to practice, they should have a CRYSTAL CLEAR roadmap of what they should do and WHY.
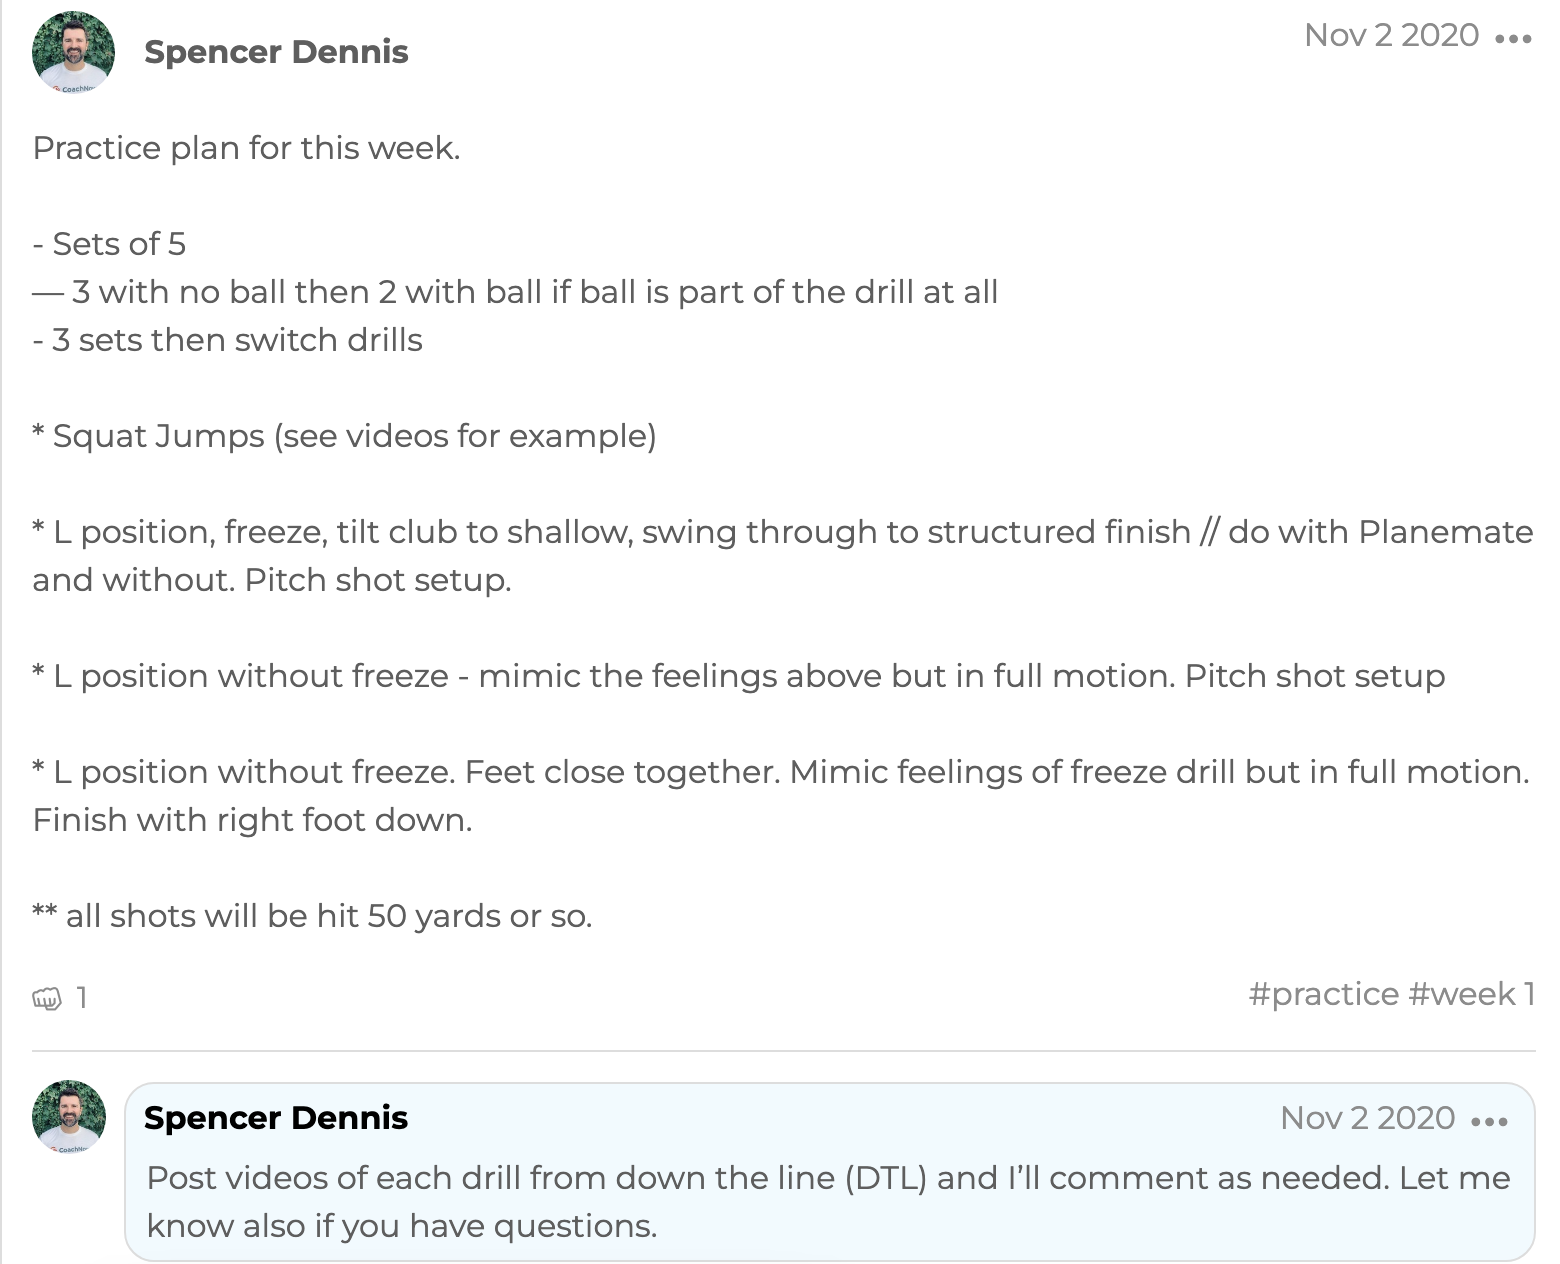
EXAMPLE OF A PRACTICE PLAN:
-1.webp?width=1560&height=1264&name=Practice_Plan-2%20(1)-1.webp)
Some notes on the photo:
- While there are exercises pertaining to Golf specifically, I also mixed in some Squat Jumps to encourage general exercise and strength training. Note also that the rest of the movements are more focused on form than outcome. As I mentioned in the last blog post, this is just one of two ways you can go about practicing goals. Remember that you’ll want to vary the goals of each practice plan based on the athlete’s individual needs.
- Each exercise has a clear explanation of what to do. It’s not just a list of terms we discussed - I also gave a step-by-step guide on how to do each exercise, with the goal of jogging his memory by describing something I taught him in person.
At the end, I gave him clear directions for how to engage with me asynchronously throughout the week . And I did so strategically – I didn’t promise too much back and forth and commit to being available 24/7. I just let him know I would comment “as needed”. This keeps him accountable by ensuring he executes on our practice plan, without causing a headache on my end with an endless feedback cycle that could burn me out.
Trust me, athletes operate well when given clear goals, easy to follow practice plans, and due dates.
Having them in writing will help them practice more efficiently and keep them accountable. No more excuses about forgetting what they were supposed to do! 👊
—
A very very important reminder: be sure to do all of this within your athlete’s Space DURING YOUR COACHING SESSION.
Everything I recommend here should be saving you time. Doing the above steps while you’re together saves you a task for later and helps add predictable structure to the sessions.
Your athlete should have everything they need BEFORE they leave your session together.
Now on to the 3 Biggest Mistakes of Video Analysis...
The 3 Biggest Mistakes of Video Analysis
When it comes to video analysis, coaches are often "missing the forest for the trees". Between this and last week's post, we're gonna make sure you aren't one of them.
Here are the top 3 mistakes I see coaches make when implementing video analysis into their coaching:
I constantly see people go overboard with the video overlay features in the CoachNow app.
Coaches will cover a video with insanely complicated technical notes and obsess with line drawing, angles, boxes, overlays, and comparisons.
My advice here is simple: it doesn't help your athletes if you break down technique in an overly complicated way.
At most, I recommend giving 1-2 pieces of technical advice per video. As I mentioned above, progress happens when many small changes aggregate over time.
Don't make the mistake of trying to fix every issue in one post – keeping it simple will ensure that your feedback stays actionable and that the information is retained.
As an added bonus, simplifying your feedback will save you time and make your life easier too. Getting bogged down in the rabbit hole of video analysis doesn't serve either party, so avoid it at all costs!
Allowing your athletes to take ownership of their development is a big deal. Your athletes shouldn't expect you to comment on every video with detailed analysis.
Instead, give them cues on how to be effective with analysis themselves. I always encourage coaches to teach their athletes how to break down technique. Don't just break it down for them.
Doing so leads to a deeper understanding of their own progress, and gives them a sense of empowerment. You won't always be there to give specific feedback, so it's important to give them the tools they need to improve on their own.
In CoachNow, you have the ability to compare your athlete to a model in your particular sport.
When importing models, be sure to choose a model with a similar body type and movement patterns you feel your athlete can achieve. Helping an athlete see where they're headed is key but it can also be discouraging if the model is too advanced or has a different body type.
One quick tip - be sure to use the "slow motion" feature in the app. When doing so, try adding voice-over feedback over the slow motion video. This is really helpful for your shared understanding of the athletes form, and can be easily used as a model to reference when you are taking videos at a normal speed.
If you follow the guidelines in our last blog, and avoid the mistakes here, you will be well on your way to effectively using the video tools in CoachNow to improve your athlete's results.
Video analysis is a key component of ConnectedCoaching. As with all things, it will take a bit of adjustment to get it right and the specifics will depend on what/ who you coach. But I hope this advice will help you save time and improve your results.
Here's to using video effectively!