A few weeks back, we launched game-changing updates to the Templates feature within CoachNow.
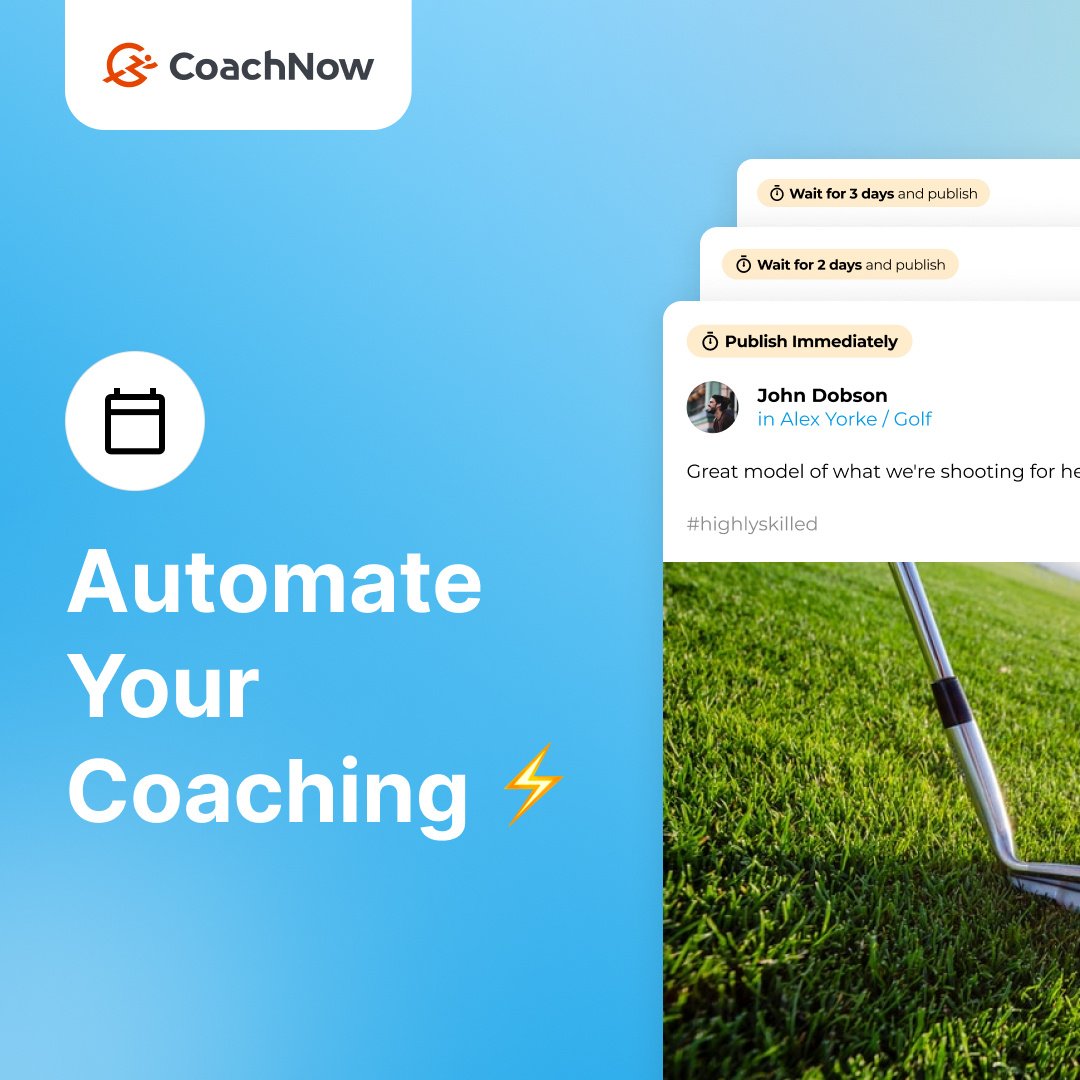
The highlight of this launch? Automated Template Scheduling.
This powerful tool allows you to create comprehensive training programs, courses, and accountability that automatically gets delivered over several days, weeks or months.
Once the template is built, it can be used in any Space, Group, or Channel. All you have to do is set the template, and let CoachNow take care of the rest. BOOM. your athletes will receive your curriculum according to the schedule you sent.
It’s a super powerful tool to offer new coaching programs without adding additional administrative work on your end.
And because you no longer have to manually deliver content and reminders, you can add value by engaging with athletes in discussions and providing personalized feedback where it matters most.
For today’s post, I’m gonna show you how to build what I’m dubbing an “Accountability Template”.
The idea here is to send a series of posts to your athletes to ensure they receive reminders of what’s expected of them during a given week. This keeps them accountable to your program, while reducing your need to constantly message them.
For today’s example, I’ll be building out a template based on the $100k Offer I’ve detailed on this blog in the past. You can read all about the $100k offer at this link.
As a reminder, here’s a rundown of what the offer looks like:
In the screenshots below, I’ll show you step by step how to build an accountability program for month 1 of the offer. I’ll also be assuming a monday start date for the program.
Note: right now, this feature will only be available in the web application.
Let’s get to it.
The highlight of this launch? Automated Template Scheduling.
This powerful tool allows you to create comprehensive training programs, courses, and accountability that automatically gets delivered over several days, weeks or months.
Once the template is built, it can be used in any Space, Group, or Channel. All you have to do is set the template, and let CoachNow take care of the rest. BOOM. your athletes will receive your curriculum according to the schedule you sent.
It’s a super powerful tool to offer new coaching programs without adding additional administrative work on your end.
And because you no longer have to manually deliver content and reminders, you can add value by engaging with athletes in discussions and providing personalized feedback where it matters most.
For today’s post, I’m gonna show you how to build what I’m dubbing an “Accountability Template”.
The idea here is to send a series of posts to your athletes to ensure they receive reminders of what’s expected of them during a given week. This keeps them accountable to your program, while reducing your need to constantly message them.
For today’s example, I’ll be building out a template based on the $100k Offer I’ve detailed on this blog in the past. You can read all about the $100k offer at this link.
As a reminder, here’s a rundown of what the offer looks like:
- 1 2-hour live session per Month
- 1 30-minute video call per Month
- Minimum 2 Q&A’s in your CoachNow Space per Week.
- Maximum 2 Video or Image Analyses in CoachNow Space Per Week
In the screenshots below, I’ll show you step by step how to build an accountability program for month 1 of the offer. I’ll also be assuming a monday start date for the program.
Note: right now, this feature will only be available in the web application.
Let’s get to it.
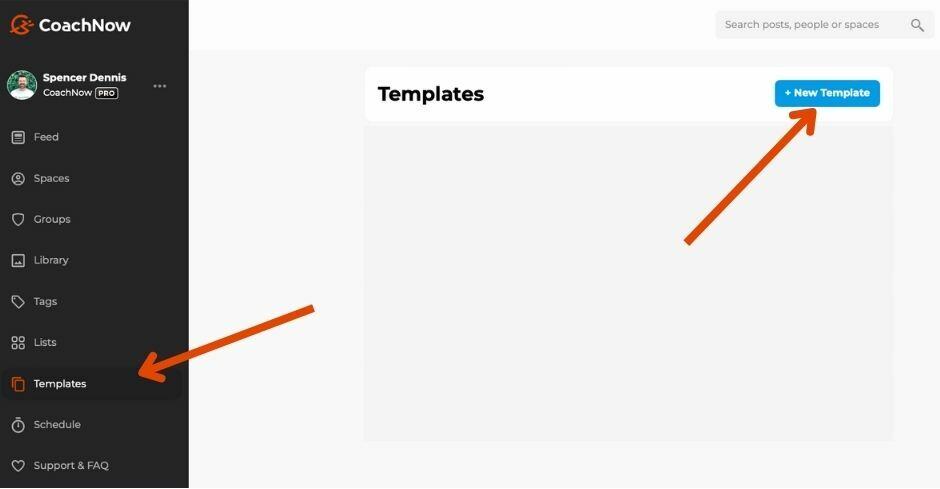
On the Web App, click the “Templates” Tab, then click “Create New”.
Give your Template a Name, then Click “Create”. In this example, we’re calling the template “$100k Offer - Month 1”
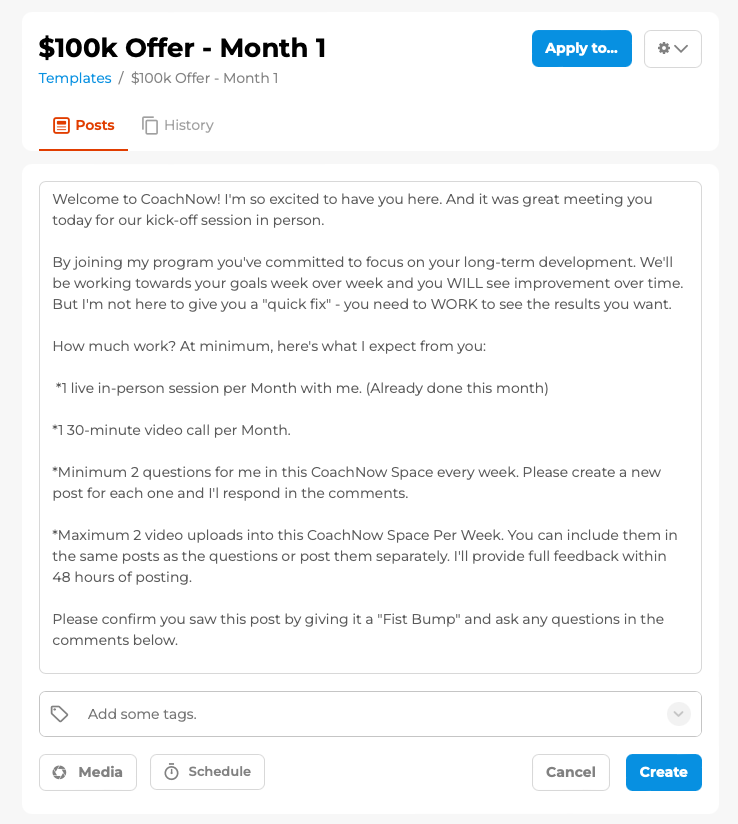
Write the first post in the sequence. Ideally, this will be a welcome post that emphasizes the importance of goal setting and long-term development.
In our example, we’re assuming the template will be applied after the first live session with the athlete. Of course, you can also use templates to sell on-demand courses as well. Here’s the post we made, feel free to use it if you’d like!
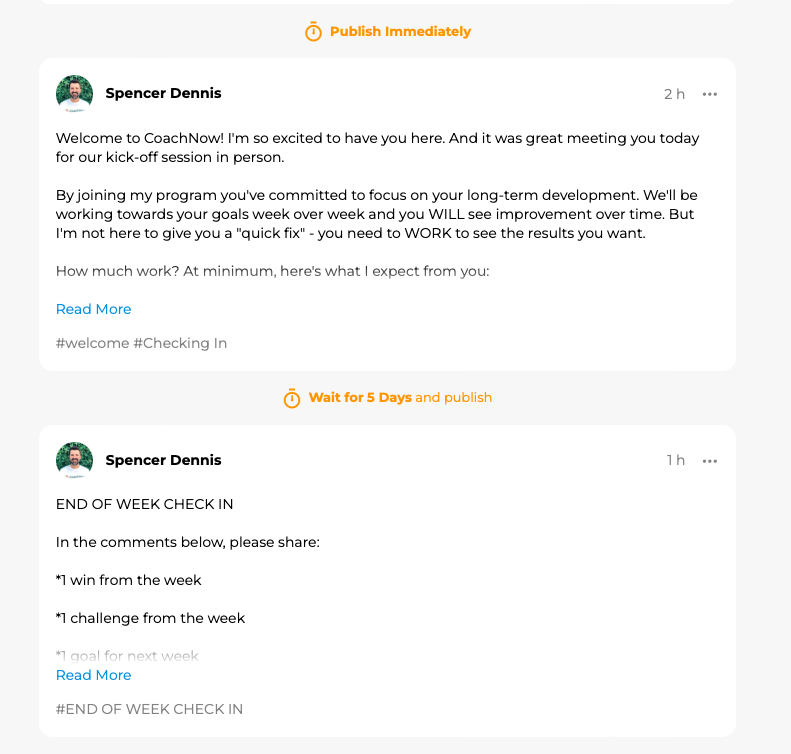
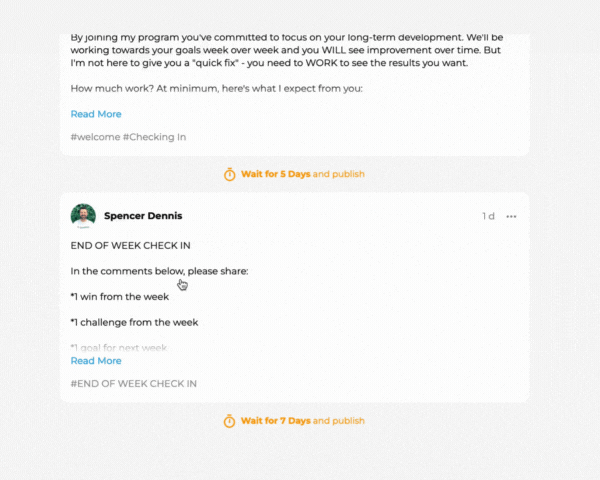
Welcome to CoachNow! I'm so excited to have you here. And it was great meeting you today for our kick-off session in person.
By joining my program you've committed to focus on your long-term development. We'll be working towards your goals week over week and you WILL see improvement over time. But I'm not here to give you a "quick fix" - you need to WORK to see the results you want.
How much work? At minimum, here's what I expect from you:
*1 live in-person session per Month with me. (Already done this month)
*1 30-minute video call per Month.
*Minimum 2 questions for me in this CoachNow Space every week. Please create a new post for each one and I'l respond in the comments.
*Maximum 2 video uploads into this CoachNow Space Per Week. You can include them in the same posts as the questions or post them separately. I'll provide full feedback within 48 hours of posting.
Please confirm you saw this post by giving it a "Fist Bump" and ask any questions in the comments below.
Book your first video call at my Calendly link: Bit.ly/calendar
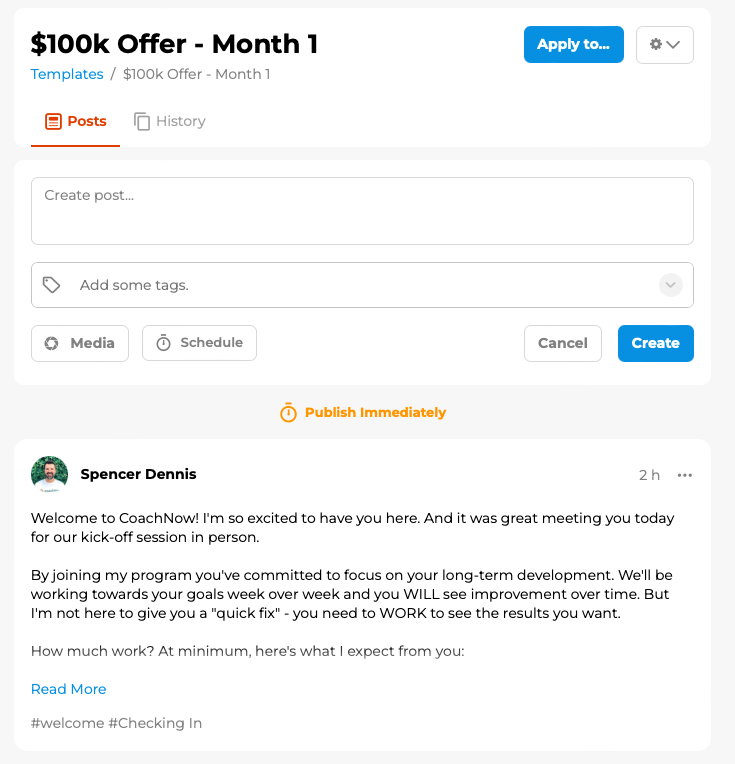
Because we want this post to appear as soon as the template is applied, click “Create”.
You will now see the post saved in the template with the test “Publish Immediately” above it in yellow. Every post below that text will appear immediately in any Space, Group, or Channel you apply it to.
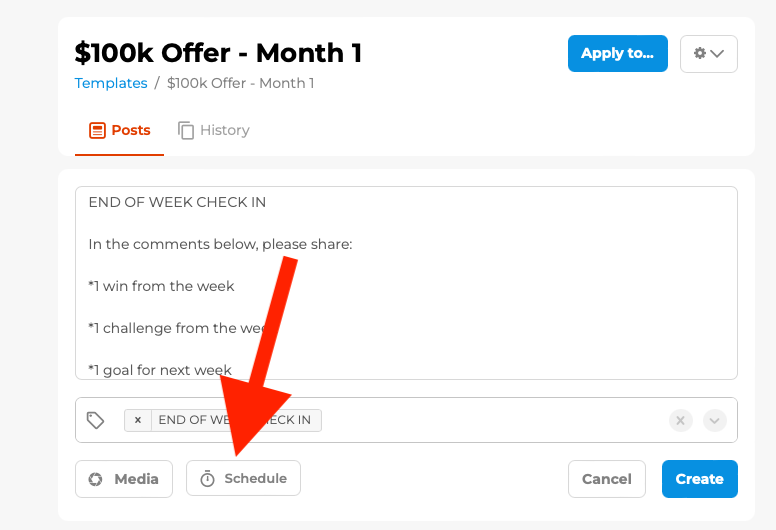
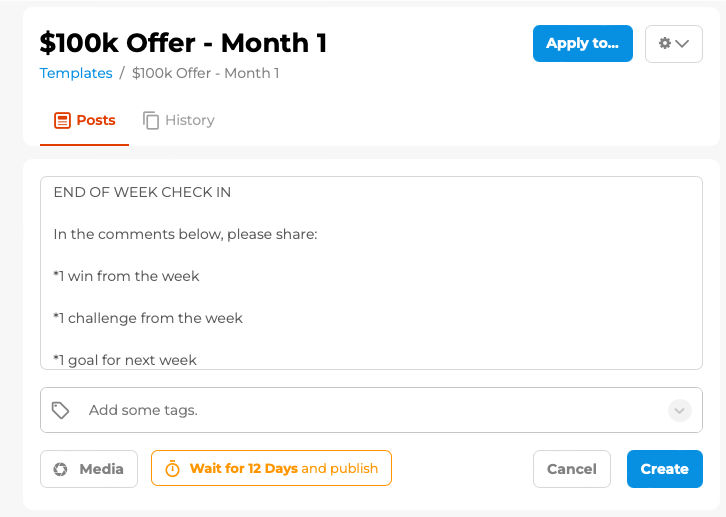
Now, create your second post.
For this example, we created an “End of Week Check in”, that we scheduled to post 5 days after the welcome message (aka the Friday after they start).
Here’s the text in the post:
Here’s the text in the post:
END OF WEEK CHECK IN
In the comments below, please share:
*1 win from the week
*1 challenge from the week
*1 goal for next week
Now Click “Schedule” to open up the schedule menu.
Choose how much time should pass before the post appears.
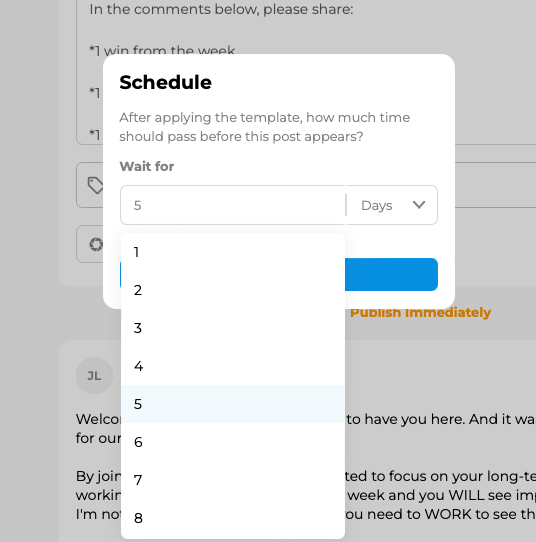
Note: This “wait time” is anchored to the beginning of the template. I.e. it is NOT referring to the time that passes between posts within the template.
For our example, we want this post to go live 5 days after the beginning of the program. You can choose any number of days, weeks, or month, depending on your program length.
Once Selected, tap “Done”.
For our example, we want this post to go live 5 days after the beginning of the program. You can choose any number of days, weeks, or month, depending on your program length.
Once Selected, tap “Done”.
You’ll now see a yellow box on the post, detailing when it will go live. Now click “Create”.
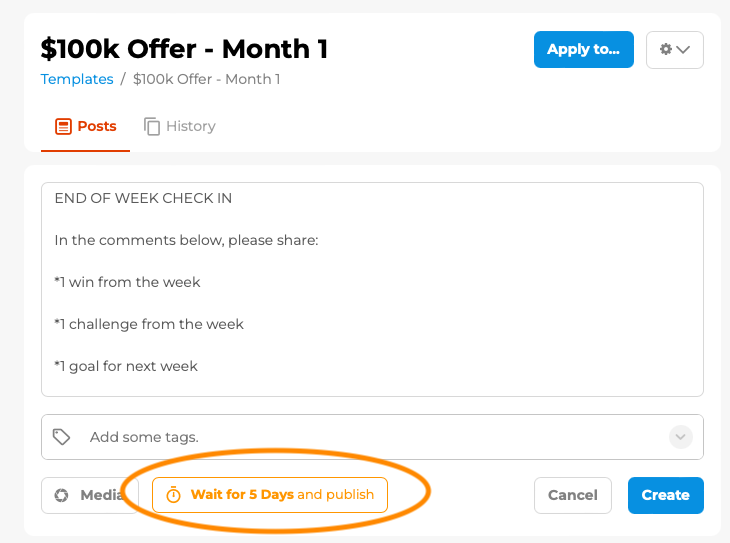
Now you’ll see the post in the template, below the first post.
Now, create your third post.
For this example, we created an “Beginning of week check in”, that we scheduled to post 7 days after the welcome message. Here you should remind them whats expected from them in the week ahead.
Here’s the message we used in the example:
Here’s the message we used in the example:
Happy Monday!
Let's crush the week! Reminder that this week you are expected to submit:
*Minimum 2 questions for me in this CoachNow Space every week. Please create a new post for each one and I'l respond in the comments.
*Maximum 2 video uploads into this CoachNow Space Per Week. You can include them in the same posts as the questions or post them separately. I'll provide full feedback within 48 hours of posting.
If you haven't already, book this month's video call at my Calendly link: Bit.ly/calendar

Click “Create” and the post will be moved to the bottom of the Template.
Now, Copy and paste the “End of Week Check In” into a new post.
You’ll want this one to post the Friday of their second week. In other words, 12 days after the template is applied.
Rinse and repeat to fill out the month.
You’ll want the end of week check in post to post on day 5, 12, 19, and 26. And you’ll want the beginning of week check in to be posted on day 7, 14, 21, and 28.
DONE.
It took me about 10 minutes to make these posts.. And now this sequence is ready to be applied to any Space, Group, or Channel with ease.
Here’s what it’ll look like when it’s all built out and ready to go
Here’s what it’ll look like when it’s all built out and ready to go
Now create another Template for all the remaining months in the program.
Following our example, we’d make a new template called “$100k Offer - Month 2+”.
The template would be identical to the first, but swapping out the first post to be another “Monday Check In” post, rather than the welcome post.
After the first month with your athlete, just apply that second template to their space. Rinse and repeat every 30 days (or, better yet, build out your initial Template for 3+ months).
Applying to a Space - 2 Ways
There are 2 key ways to apply this template to a space:
- Directly within the template itself (for an already existing Space)
- When creating a new Space and inviting an athlete.
Method 1. Apply From Within the Template:
Simply click “Apply to..” in the top right corner of the Template. Then, select “Space”, “Group”, or “Channel” and select where you want to send the Template. Then Tap “Apply”.
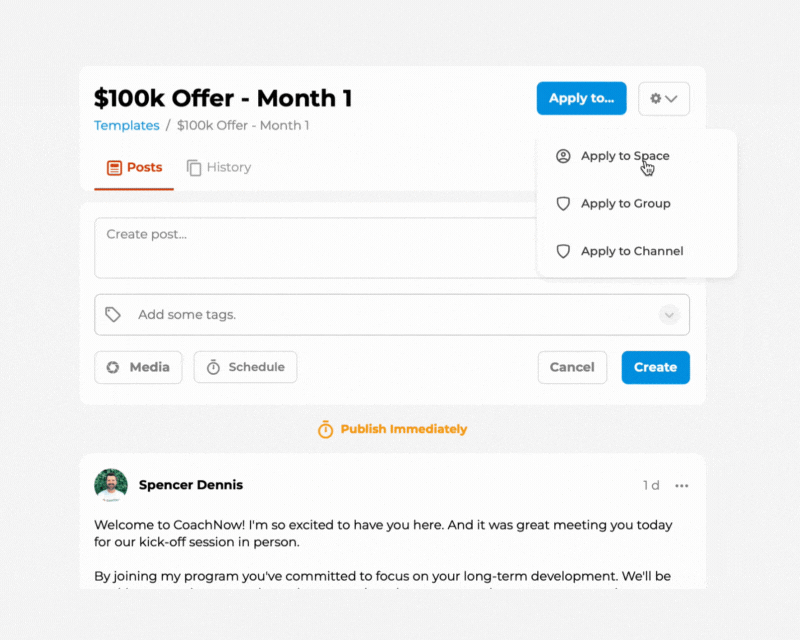
Any posts set to “Apply Immediately” will immediately be posted in your chosen destination.
If you go to the Space later on, you’ll see a notice that lets you know how many more posts are scheduled for the future.
If you go to the Space later on, you’ll see a notice that lets you know how many more posts are scheduled for the future.

Method 2. Apply From Within the Template:
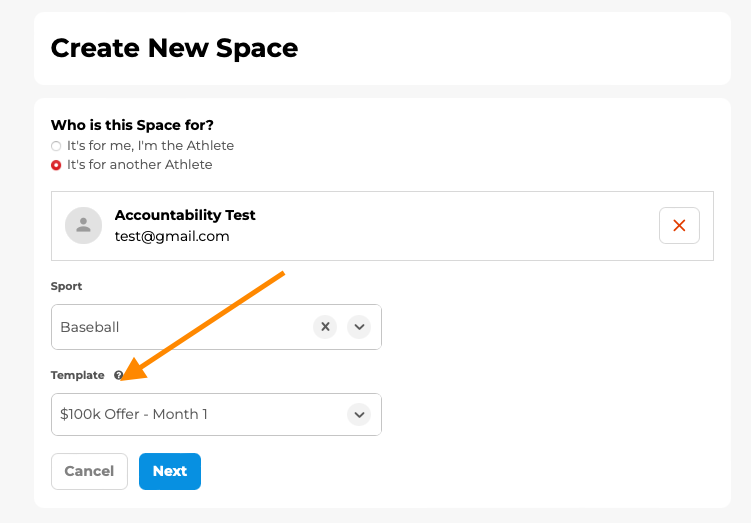
Alternatively, go to the “Spaces” tab in the platform, and click “+ New Space”
Then, when inviting your athlete, select the Template from the dropdown menu.
Then, when inviting your athlete, select the Template from the dropdown menu.
Boom. Your Template Schedule is kicked off and they’ll receive your posts according to the schedule you set.
Wrapping Up
With these updates to the Templates Feature, CoachNow is taking coaching efficiency to new heights.
Coaches can now apply templates to existing spaces and groups, eliminating repetition, and automating the feedback loop.
The automated scheduling feature further enhances athlete engagement by delivering content on a pre-set timeline, freeing you up to focus on what truly matters – individualized guidance, feedback, and support.
And this is just the beginning! This feature will become even more robust in the coming months as we hear feedback from our members.
Whether you're striving for personalized engagement or seeking to streamline group coaching, these updates are designed to make your coaching journey smoother and more impactful.